I make a lot of ice cream and particularly in the early Spring when the cows are on the new pasture and all our chickens are laying. However, I love making ice cream all year round and this is one I came up with for Halloween or a party with a horror or bad taste theme.
There is a very silly and highly coloured B Movie, based (very loosely) on Edgar Allen Poe's, The Raven and which stars four of my favourite comedy horror and noir actors; Peter Lorre, Boris Karloff, Vincent Price and Jack Nicholson. One scene shows a reluctant sorcerer, Vincent Price's character, Dr Craven, searching his defunct father's laboratory for ingredients, the expression on his face when he opens a box to find a whole slew of eyeballs staring back at him is, well,... priceless.
A FOREWORD ON VANILLA
I always use whole organic vanilla pods aka beans and for ice cream I have found the best way to get that rich full flavour is to split the bean lengthways and let it infuse into the milk overnight. I can later in the process then wash and dry out the bean and add it to my sugar storage box. However, another and perhaps easier and more economical way to do this is if I add the whole bean (un-split) to a storage box of sugar in the first place. This way I can keep adding sugar for as long as the bean still has the aroma of vanilla (quite a time actually!) and always have vanilla sugar ready-infused and handy for all my recipes. I tend to start with this rich vanilla custard base for all my ice cream varieties, as I find it creates an extra depth to complement all the other flavours.
A FOREWORD ON RAW MILK
It is very easy here in France to buy raw organic milk. In fact outside farm gate sale hours, there is even a handy raw milk vending machine in the next town down the coast from us! If you live in a country where you may have to travel a long way to obtain it and thus buy in bulk, this is another handy way to store it.
EQUIPMENT
I don't have an ice cream maker so this is the hand-made method but it is much easier if you have an electric whisk!
A flat edged wooden spatula or spoon and a silicon spatula to remove the last drop of custard from the pan!
I
also try to use a minimum of plastic in our lives, so I recently was able to get hold of some glass food storage boxes which are freezer safe. These are particularly useful for ice cream and sorbet making.
INGREDIENTS
For the Ice Cream:
(Makes 2½ litres, around 4 UK pints or 2½ quarts of ice cream)
I always make ice cream in large amounts, one because you can never have too much and I also find it freezes better that way. You can make a lot of eyeballs out of this mix but as I've plenty more ice-cream recipes on the way, this amount of ready-made rich vanilla will come in very handy.
I always make ice cream in large amounts, one because you can never have too much and I also find it freezes better that way. You can make a lot of eyeballs out of this mix but as I've plenty more ice-cream recipes on the way, this amount of ready-made rich vanilla will come in very handy.
1½ litres (2½ UK pints), (just over 3 US pints) of raw full-cream milk
9 eggs (12 bantam)
255g (9oz) (just over 1 cup) blond cane sugar
250ml (8 fl oz) (1 cup) raw thick cream
A vanilla bean split lengthways (or ready-infused into the sugar above)
METHOD
For the Ice Cream
Place the vanilla bean in the milk in a heavy bottomed pan and heat to below boiling point, just when you start to see water vapour rising off the milk. Remove from heat and leave to stand - I tend to leave it overnight but that is not necessary.
Re-heat the milk to below boiling.
Add the milk to the egg and sugar mixture and whisk well.
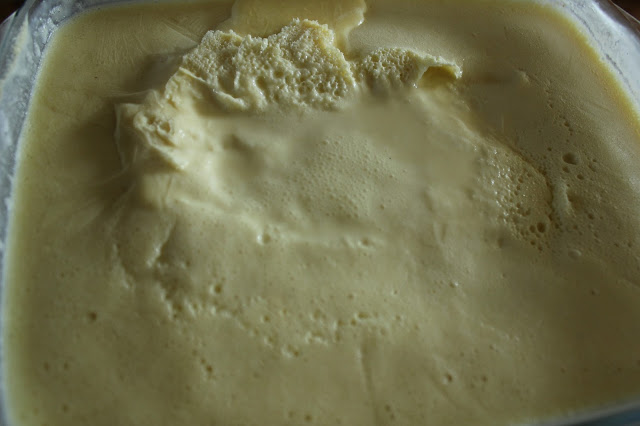
Use the same pan you had the milk in (no need to wash it!) to slowly heat the mixture. Some people are scared of making egg custard this way, they are worried they will end up with 'scrambled egg' but if it bothers you then you can use a bain marie. If you are unaware of this method, just place your pan in another wider pan ( a frying pan, for example) containing a couple of centimetres (an inch) of warm water, so that your custard mixture is not in direct contact with the heat but sits inside the pan of heated water. Personally, I think if you have your custard on a gentle heat and are constantly stirring, you will be fine. At this point you need to put a good film on your computer, as it will take around 20 minutes constantly stirring the mix before the custard is ready. You will know when because it will start to coat the back of the spatula - as in the picture above.
Leave your custard to cool.
When cool add the cream and whisk thoroughly.
Pour the completed ice-cream custard into your freezer box, using the silicone spatula to get every last precious bit.
Put the box into the freezer. I have a really simple freezer, so my ice-cream is left overnight to get to the part-set stage.
When the ice-cream is part set, you need to break up the ice crystals to form a smooth creamy texture.
Return the ice cream into the box and put back in the freezer. Leave to set again.
I usually get the ice cream out once more, when it is part set and repeat the process.
Once the ice cream is fully set you will be ready to go on to the next stage.
INGREDIENTS
For the Eyes:
I chose very simple organic ingredients, two sorts of chocolate; milk
and plain, cocoa, to make the flecks in the irises, powdered sugar to
add a glint to the pupil. I built up the eye onto a chocolate 'button'
which gave me the round shape, I can buy these from the jar in my local
organic store, so just got the amount I needed.
I actually made
the icing sugar from the same cane sugar I had used in the custard. I
just needed to put it through a coffee grinder. Organic sugar isn't
white so it doesn't have the same look as non-organic icing sugar but
that didn't bother me!
METHOD
For the Eyes:
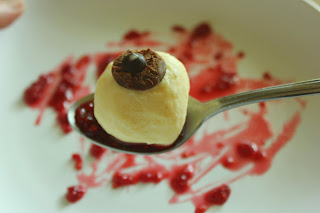
So that everything was ready for me to make the eyes, I slowly melted my two chocolates in glass pitchers/jugs,standing in hot water.
Then I sieved coco onto the eyes to add coloured flecks to the iris.
Using a spoon I could then drop the dark chocolate pupil into the eye.
I added the icing sugar 'glint' with the end of a crab fork.
INGREDIENTS
For the Raspberry sauce:
2 heaped dessert spoons raspberries1- 2 dessert spoons of blonde cane sugar
METHOD
For the Raspberry sauce and finishing the dish:
I cooked this quickly in a small pan on the top of the stove until it began to thicken to a syrup, I kept stirring it with a wooden spatula, as it is such a small amount and I didn't want it to burn.
I placed the spoons and the dish in the freezer first.
When the sauce was cool I smeared it all over the bottom of my plate and then began to form the eye balls.
I only have a rudimentary ice cream scoop so I made two halves of the eye balls and then moulded them together. Between making each one, I rinsed my hands in cold water, to add to the cooling effect. If you can get hold of a fancy ice cream scoop then you will get a complete eye ball in one go!
The 'blood' smeared on a chilled plate also stopped the ice cream from melting. We also added more sauce over the top of the eye balls to make it even gorier!
Enjoy!
All that needs to be said now is Bon Appėtit!
All the best,
Sue
Enjoy!
All that needs to be said now is Bon Appėtit!
Hope to see you here again for another recipe from my 100 Gluten-Free Organic Party Foods Challenge!
All the best,
Sue
RETURN TO MAIN CONTENTS PAGE
RETURN TO 100 GLUTEN-FREE PARTY RECIPES CONTENTS
© Sue Cross 2017


